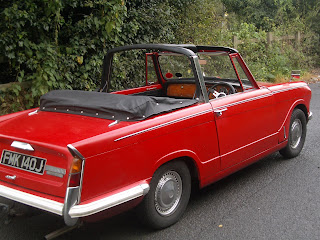
It's been just over two years since I began the restoration in October 2007 and today it passed the MOT. It initially failed the test yesterday due all the lights failing and the fuel pipe becoming unclipped from the chassis.
I wouldn't mind but I checked the lights once it was booked in for the test, and again just before I drove it to the garage. It turned out to be a faulty bullet connector block so at least it was an easy fix, and the sparks under the dashboard led me straight to it! The fuel pipe clip must have come off when I removed the tank a few weeks ago, again I had a spare so no real hassle.
All I have to do now is get it taxed and the shake down testing can begin.
Saturday 21 November 2009
Tuesday 17 November 2009
Finished at last (well almost)
The car is back together and all I have left to do is to buy & fit the rubber bumpers, and put it through the MOT (booked in for Friday 20th November).


Monday 5 October 2009
Tub restoration
I've just realised I've forgotten to post a whole section on tub refurbishment which I prepared months ago, as a result my blog is now out of sequence! Scroll down if you want to see the tubs reunited with the chassis.
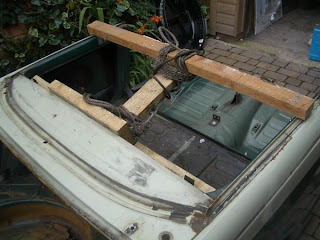
You may recall from my first instalment the tubs are stored on a platform above the chassis, I now needed to devise a way of easily moving the tubs to enable me to work on them. Most people begin with the front tub but I decided to start with the rear tub as this occupies most of the available garage space, my plan being once finished to drop it on the chassis so I could easily wheel it in and out of the garage in one lump. After a lot of trial and error with the engine hoist I settled on mounting one block of wood on brackets attached to the seat belt fixings, and a second block mounted behind where the rear seat would be. Attaching this second block required drilling the steel work but it will be out of sight behind the seat once reassembled. I also attached a third block of wood to sit proud of the parcel shelf to allow me to turn the tub upside down without causing damage. A fourth block of wood bridged the first two and gave me somewhere to attach the engine hoist. Finally I bolted a block of wood to the boot slam panel to protect it when being lifted as it pressed on the engine hoist.
The new well was just a few millimetres larger in diameter than the original but unfortunately 50mm deeper. I had to reduce the depth otherwise it would sit below the rear valance and look totally wrong. Using an electric jigsaw I removed the top 50mm from the well, and the resulting band slipped down the lower half, effectively lowering the top lip by 50mm. All I had to do now was re-weld the two halves – all sounds nice and easy doesn’t it! I hope I’ve got this right but I’m not going to know for sure until everything is finally put back together in a few months time, therefore I haven’t welded the well in place just yet.
You may recall from my first instalment the tubs are stored on a platform above the chassis, I now needed to devise a way of easily moving the tubs to enable me to work on them. Most people begin with the front tub but I decided to start with the rear tub as this occupies most of the available garage space, my plan being once finished to drop it on the chassis so I could easily wheel it in and out of the garage in one lump. After a lot of trial and error with the engine hoist I settled on mounting one block of wood on brackets attached to the seat belt fixings, and a second block mounted behind where the rear seat would be. Attaching this second block required drilling the steel work but it will be out of sight behind the seat once reassembled. I also attached a third block of wood to sit proud of the parcel shelf to allow me to turn the tub upside down without causing damage. A fourth block of wood bridged the first two and gave me somewhere to attach the engine hoist. Finally I bolted a block of wood to the boot slam panel to protect it when being lifted as it pressed on the engine hoist.

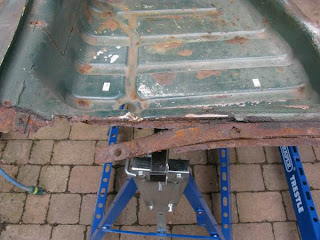
With all this place I was finally able to withdraw the tub from the garage and lower it to the ground. I now rolled the tub right over on its back end until it sat upside down, resting on the blocks of wood I had previously fitted. I now had to devise a way to lift and move the tub upside down as I didn’t fancy rolling it back over every time I wanted to work on it. I drilled bolted a length of angle iron to a pair of body mounting brackets, and attached a block of wood via the tub mountings holes situated in the drive shaft tunnel. I could now attach a lifting strap and shackle between the angle iron and block of wood, via which I could lift the tub with the engine hoist.
This all sounds quick and easy but believe me when I say it took several hours of head scratching, and I felt I was taking three steps forward and two steps back. This is not an ideal solution and probably would not pass a health & safety inspection, but at least I could now move the tub either way up, single handed, and in a matter of minutes.
Right, now I could get to work removing what felt like a mountain of underseal. After a little experimentation I decided the easiest way to remove the underseal was to lightly soften it with an electric paint stripping gun and old wood chisels of various sizes. I soon discovered it didn’t pay to apply too much heat as this resulted in a very sticky mess to clean up later! As this is such a laborious task, I tackled the job an hour at a time over a couple of weeks, whenever I had a spare hour I would be out there stripping underseal.
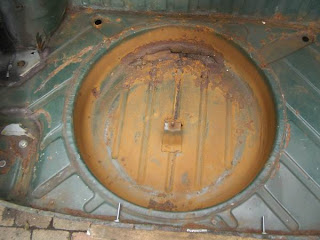
It was only once all the underseal was removed that the extent of rot became apparent. I was going to need two outer wheel arches and a spare wheel well as well as several patches welding in place before this tub would be ready. Don’t get me wrong, the tub is still not bad considering it’s unlikely to have ever been removed in the 43 years since it left the showroom.
I’m not going to go into detail but I had to cut out and replace the rotten metal beginning with the boot corners where the tub attaches to the boot outriggers. These are double-skinned so a little tricky to replace but absolutely necessary for structural integrity. I also had to repair a couple of nasty holes just behind the wheel arches, the front edge of floor where it joins the front tub, and I had to fit a repair panel to the nearside rear wing where it joins the floor just in front of the wheel arch. I could not locate a spare wheel well in good condition but I did find a brand new wheel well from a Vauxhall Astra for only £20 (sorry to all the purists). If anyone would like to do the same then according to the label that was attached to the well the Vauxhall part number is 9196180
This all sounds quick and easy but believe me when I say it took several hours of head scratching, and I felt I was taking three steps forward and two steps back. This is not an ideal solution and probably would not pass a health & safety inspection, but at least I could now move the tub either way up, single handed, and in a matter of minutes.
Right, now I could get to work removing what felt like a mountain of underseal. After a little experimentation I decided the easiest way to remove the underseal was to lightly soften it with an electric paint stripping gun and old wood chisels of various sizes. I soon discovered it didn’t pay to apply too much heat as this resulted in a very sticky mess to clean up later! As this is such a laborious task, I tackled the job an hour at a time over a couple of weeks, whenever I had a spare hour I would be out there stripping underseal.
It was only once all the underseal was removed that the extent of rot became apparent. I was going to need two outer wheel arches and a spare wheel well as well as several patches welding in place before this tub would be ready. Don’t get me wrong, the tub is still not bad considering it’s unlikely to have ever been removed in the 43 years since it left the showroom.
I’m not going to go into detail but I had to cut out and replace the rotten metal beginning with the boot corners where the tub attaches to the boot outriggers. These are double-skinned so a little tricky to replace but absolutely necessary for structural integrity. I also had to repair a couple of nasty holes just behind the wheel arches, the front edge of floor where it joins the front tub, and I had to fit a repair panel to the nearside rear wing where it joins the floor just in front of the wheel arch. I could not locate a spare wheel well in good condition but I did find a brand new wheel well from a Vauxhall Astra for only £20 (sorry to all the purists). If anyone would like to do the same then according to the label that was attached to the well the Vauxhall part number is 9196180
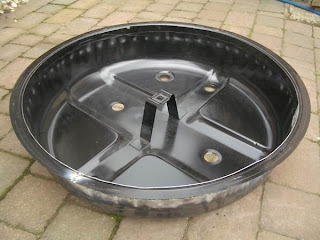
The new well was just a few millimetres larger in diameter than the original but unfortunately 50mm deeper. I had to reduce the depth otherwise it would sit below the rear valance and look totally wrong. Using an electric jigsaw I removed the top 50mm from the well, and the resulting band slipped down the lower half, effectively lowering the top lip by 50mm. All I had to do now was re-weld the two halves – all sounds nice and easy doesn’t it! I hope I’ve got this right but I’m not going to know for sure until everything is finally put back together in a few months time, therefore I haven’t welded the well in place just yet.
Replacing the outer wheel arches was no easy task either as they were a different profile to the originals so were difficult to mate up with the inner arches. I expect if I had replaced both halves then this would not have been a problem, so another tip for anyone contemplating their wheel arches is to do them in complete sets.
The final fabrication was to repair the front edge of the floor pans as they had rotted away where they overlap with the front tub. This is not a difficult task but care has to be taken to ensure the holes are correctly positioned otherwise I might have problems when the two tubs are re-united.
Refurbishing the front tub was more-or-less a repeat process so I won’t go in to detail, but as you can probably imagine it was another round of chopping out rot and letting in new steel.
Finally all loose paint was removed from the underside before painting it with Kurust and rust-preventative undercoat. The only thing left to do now is to sort out the doors, bonnet, sills, boot lid and valances (if I say it quick enough it doesn’t sound too bad!).
Before I move on to these other panels I will be re-spraying the tubs so I can attach them to the chassis thereby making more room in the garage. I will probably be covering this in my next instalment, but don’t expect too much as I’m a total novice with the spray gun.
Before I move on to these other panels I will be re-spraying the tubs so I can attach them to the chassis thereby making more room in the garage. I will probably be covering this in my next instalment, but don’t expect too much as I’m a total novice with the spray gun.
Thursday 6 August 2009
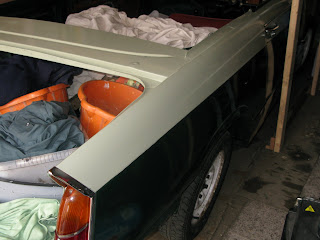
I don't seem to have much time to write lately so I'll keep this short. Both tubs have been resprayed and are now reunited with the chassis. The engine is up & running and sounds great. I can drive the car backwards & forwards on the drive, and I have working brakes to stop it again, coolant is in, in fact the engine bay is all complete. I have also fitted the front windscreen along with washers & wipers which are also working (I have made one concession to modernity by fitting an electric washer). It's starting to look like a car again.
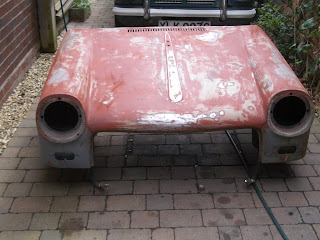
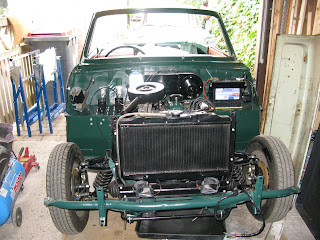
I am currently working on prepping and spraying the remaining panels - bonnet, doors, boot lid, roof, sills, valances, spare wheel well, etc and I will post more pictures when it's all reassembled. I'll provide more detail next time but meanwhile here are a few photographs -
Resprayed rear tub hiding in the shadows -
Bonnet being prepped -
Engine bay fitted out -

Engine bay complete and sparkling -
I am currently working on prepping and spraying the remaining panels - bonnet, doors, boot lid, roof, sills, valances, spare wheel well, etc and I will post more pictures when it's all reassembled. I'll provide more detail next time but meanwhile here are a few photographs -
Resprayed rear tub hiding in the shadows -

Bonnet being prepped -

Engine bay fitted out -

Engine bay complete and sparkling -

Tuesday 14 April 2009
Engine in
The restoration has slowed down over the winter months but I have managed to push on and rebuild the engine. I’m not going to detail the rebuild in any detail as I’m no expert and certainly cannot do as good a job as the various manuals readily available from other sources, instead I will just mention some of the key points in my own rebuild.
The first thing I noticed was the engine number proving this is the original block as detailed on the English Heritage Certificate which came with the car. Bolstered by this good news I decided this engine would be rebuilt regardless of whatever I find when stripping it down.
I had already completed a compression check before I took the car off the road so although I can’t now recall the exact readings, I do know they were all good and within a narrow range of each other.
The engine came apart with no problems or horror stories as nothing snapped or stripped. The cylinder head was off in a few minutes and I was pleased to see there is no lip on the bores, no scoring, and no scorch marks, all indications that I was looking at a very good engine. The pistons also carry no markings suggesting the engine has never been rebored. With this in mind I decided not to disturb the pistons as that would entail fitting new rings and honing the bores. Some people may think this is false economy but my view is ‘if it aint broke then don’t fix it’, after all it’s quite obvious this engine is good for a few thousand miles and as I only do a few hundred a year it should last me a long time.
I next removed the main bearings and big ends and found they were in good condition with no scoring and were still original size, ie this engine has never been rebored or reground since it was first built 43 years ago – an impressive state of affairs I think you will agree? The rocker shaft was in good condition so that was to be re-fitted and I did not strip the valves as I could see no good reason to do so.
The engine block was cleaned of all the gunk accumulated over it’s long life, what was left of the original paint was removed and finally repainted in gloss black in readiness for the rebuild. All external components were stripped and repainted before re-assembly.
I replaced the main bearings and big end shells, thrust washers, timing chain & adjuster, and all gaskets. The oil pump was well within specification so that was refitted. I really can’t believe how good this engine is considering the car as a whole didn’t appear to be particularly well maintained, maybe a testimony to how well these cars were built originally – or am I just lucky?
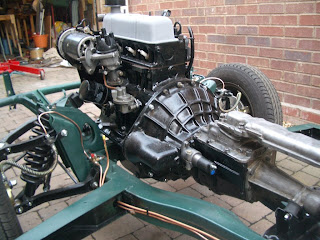
I knew the gearbox was in good condition so it was cleaned up, the cast iron parts painted in gloss black, and the rear oil-seal replaced. A new clutch assembly was fitted and the gearbox reunited with the engine. The prop-shaft was cleaned up and sprayed black (I don’t know if these were painted when new but my view is if it can be painted then paint it), universal joints replaced and the shaft attached to the diff. Finally new engine and gearbox mountings were fitted and the whole unit dropped back onto the chassis.

The first thing I noticed was the engine number proving this is the original block as detailed on the English Heritage Certificate which came with the car. Bolstered by this good news I decided this engine would be rebuilt regardless of whatever I find when stripping it down.
I had already completed a compression check before I took the car off the road so although I can’t now recall the exact readings, I do know they were all good and within a narrow range of each other.
The engine came apart with no problems or horror stories as nothing snapped or stripped. The cylinder head was off in a few minutes and I was pleased to see there is no lip on the bores, no scoring, and no scorch marks, all indications that I was looking at a very good engine. The pistons also carry no markings suggesting the engine has never been rebored. With this in mind I decided not to disturb the pistons as that would entail fitting new rings and honing the bores. Some people may think this is false economy but my view is ‘if it aint broke then don’t fix it’, after all it’s quite obvious this engine is good for a few thousand miles and as I only do a few hundred a year it should last me a long time.
I next removed the main bearings and big ends and found they were in good condition with no scoring and were still original size, ie this engine has never been rebored or reground since it was first built 43 years ago – an impressive state of affairs I think you will agree? The rocker shaft was in good condition so that was to be re-fitted and I did not strip the valves as I could see no good reason to do so.
The engine block was cleaned of all the gunk accumulated over it’s long life, what was left of the original paint was removed and finally repainted in gloss black in readiness for the rebuild. All external components were stripped and repainted before re-assembly.
I replaced the main bearings and big end shells, thrust washers, timing chain & adjuster, and all gaskets. The oil pump was well within specification so that was refitted. I really can’t believe how good this engine is considering the car as a whole didn’t appear to be particularly well maintained, maybe a testimony to how well these cars were built originally – or am I just lucky?
I knew the gearbox was in good condition so it was cleaned up, the cast iron parts painted in gloss black, and the rear oil-seal replaced. A new clutch assembly was fitted and the gearbox reunited with the engine. The prop-shaft was cleaned up and sprayed black (I don’t know if these were painted when new but my view is if it can be painted then paint it), universal joints replaced and the shaft attached to the diff. Finally new engine and gearbox mountings were fitted and the whole unit dropped back onto the chassis.

The only ancillary component that really needed replacing was the distributor as the original was in poor condition, but luckily I had managed to get an excellent looking one from the 2008 Stafford show. I wasn’t sure if it was the right one when I bought it but comparing numbers when I got back home confirmed it is the correct one for my engine. I also have three starter motors and dynamos from which I can choose the best.
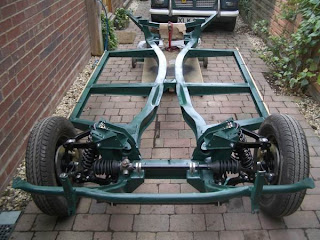
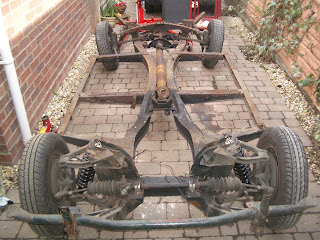
Seeing the engine in situ was a real boost for me as I’m starting to feel good progress is being made – and it looks great sat on the refurbished chassis. Next step is to prepare the tubs which I will detail in my next instalment. I am getting concerned that progress has slowed down due to winter, work and other commitments, as well ensuring my family don’t feel abandoned, but I will keep pushing to complete the car as soon as possible, there is no way this project is going to turn into several years work like some I read about!
Sunday 1 March 2009
Rolling chassis
You will probably recall that my previous two reports covered how I tacked the strip down of the car and progressed to the restoration and spraying of the chassis. This instalment will detail how I set about rebuilding the rolling chassis, the part of the restoration I was most looking forward to as this is where the first shiny new bits get fitted.
When the car was stripped I left as many components as possible as sub-assemblies. There were two good reasons for this, firstly the reduced likelihood of loosing small parts, and secondly I didn’t need to commit to memory all the detail of how the sub-assemblies actually bolted together, I could now strip them and rebuild them almost immediately with the detail still fresh in my mind. I also have a nearly 200 photographs taken during the strip down to use a reference points for the rebuild. I’m also lucky enough to own a second Herald which I will use as reference if I get really stuck.
One of my objectives when deciding to undertake this restoration was to renew the entire braking system, this was one area I was not prepared to compromise on as previous Herald experience has taught me the need to have the brakes working as efficiently as possible if I’m not to run into the back of a modern car with ultra efficient servo-assisted brakes. I’m not going to upgrade any components but will instead restore the system to its original specification as I believe the braking system is up to modern standards if well maintained. With this in mind I am going to be fitting professionally reconditioned callipers, new discs, new shoes and pads, new master cylinder, new rear slave cylinders, and new copper pipes. The brake drums look like recent replacements so these are the only items not to be replaced.
All steering joints will also be replaced even though they look to be decent condition as I see little point in re-fitting key components which have a limited road-going life anyway, therefore I will be replacing the ball joints, trunnion bushes, trackrod ends, and anti-roll bar drop links. The steering rack looks to be in very good condition and as these are not known to wear unduly I will refit the existing unit, but I will replace the gaiters as failure here can lead to premature failure of the rack itself.
All steering and suspension rubber bushes will be replaced with new ones, but not with the modern polybushes that everyone seems to rate as I think the Herald gives a decent ride in standard form for normal road use so I’m sticking with the original set-up.
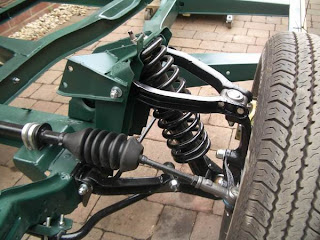
I am also going to renew the dampers all round with new coil springs on the front. The rear leaf spring appears to have been replaced or reconditioned previously so I’ll just refurbish and reuse it. Any damaged structural components will be replaced, with second hand parts sought where appropriate to reduce overall cost, eg one badly worn lower wishbone.
I began by stripping the steering and suspension assemblies down to their component parts. This is where a bit of ingenuity may be called for as the wishbone bolts are often seized in the bushes and cannot always be removed easily, as was the case for me in all but one bolt.
There are two ways to remove the bolts, you can apply repeated doses of penetrating oil over a few days in the hope that will release them, or if you’re replacing the bushes and bolts anyway then you can simply cut through the bolts with a hacksaw. Once the wishbones are released you can then push out the bushes with the aid of a vice and a couple of sockets, or if they’re really seized solid you may need to revert to a blow torch to melt the rubber thereby allowing the bushes to fall out. I wouldn’t recommend this latter method if it can be avoided as the smell of burning rubber at close quarters is not very pleasant, plus there is the obvious health risk as well as fire hazard.
All parts to be re-used were cleaned of crud using various tools including wire brush, rotary wire brushes, sanding disks, angle grinder, scraper, knife, etc. Once all traces of old rust and underseal were removed everything was coated in Kurust. I’ve used Kurust many times and it always seems to work well when used prior to applying primer or undercoat. All components were finally sprayed in gloss black prior to assembly.
I’ve replaced all nuts & bolts with new ones as they look great against the new paintwork but are also less likely to strip. All nylock nuts should be replaced as a matter of course as they are usually only fitted in critical places and should never be reused.
The differential unit took a lot of cleaning, presumably with more than 40 years worth of, oil, grease and dirt accumulated on it, but it came up like new. New oil seals were fitted and the whole unit repainted in gloss black. Replacing the oil seals was not easy and if I ever do it again I shall entrust the work to a professional.
When the car was stripped I left as many components as possible as sub-assemblies. There were two good reasons for this, firstly the reduced likelihood of loosing small parts, and secondly I didn’t need to commit to memory all the detail of how the sub-assemblies actually bolted together, I could now strip them and rebuild them almost immediately with the detail still fresh in my mind. I also have a nearly 200 photographs taken during the strip down to use a reference points for the rebuild. I’m also lucky enough to own a second Herald which I will use as reference if I get really stuck.
One of my objectives when deciding to undertake this restoration was to renew the entire braking system, this was one area I was not prepared to compromise on as previous Herald experience has taught me the need to have the brakes working as efficiently as possible if I’m not to run into the back of a modern car with ultra efficient servo-assisted brakes. I’m not going to upgrade any components but will instead restore the system to its original specification as I believe the braking system is up to modern standards if well maintained. With this in mind I am going to be fitting professionally reconditioned callipers, new discs, new shoes and pads, new master cylinder, new rear slave cylinders, and new copper pipes. The brake drums look like recent replacements so these are the only items not to be replaced.
All steering joints will also be replaced even though they look to be decent condition as I see little point in re-fitting key components which have a limited road-going life anyway, therefore I will be replacing the ball joints, trunnion bushes, trackrod ends, and anti-roll bar drop links. The steering rack looks to be in very good condition and as these are not known to wear unduly I will refit the existing unit, but I will replace the gaiters as failure here can lead to premature failure of the rack itself.
All steering and suspension rubber bushes will be replaced with new ones, but not with the modern polybushes that everyone seems to rate as I think the Herald gives a decent ride in standard form for normal road use so I’m sticking with the original set-up.
I am also going to renew the dampers all round with new coil springs on the front. The rear leaf spring appears to have been replaced or reconditioned previously so I’ll just refurbish and reuse it. Any damaged structural components will be replaced, with second hand parts sought where appropriate to reduce overall cost, eg one badly worn lower wishbone.
I began by stripping the steering and suspension assemblies down to their component parts. This is where a bit of ingenuity may be called for as the wishbone bolts are often seized in the bushes and cannot always be removed easily, as was the case for me in all but one bolt.
There are two ways to remove the bolts, you can apply repeated doses of penetrating oil over a few days in the hope that will release them, or if you’re replacing the bushes and bolts anyway then you can simply cut through the bolts with a hacksaw. Once the wishbones are released you can then push out the bushes with the aid of a vice and a couple of sockets, or if they’re really seized solid you may need to revert to a blow torch to melt the rubber thereby allowing the bushes to fall out. I wouldn’t recommend this latter method if it can be avoided as the smell of burning rubber at close quarters is not very pleasant, plus there is the obvious health risk as well as fire hazard.
All parts to be re-used were cleaned of crud using various tools including wire brush, rotary wire brushes, sanding disks, angle grinder, scraper, knife, etc. Once all traces of old rust and underseal were removed everything was coated in Kurust. I’ve used Kurust many times and it always seems to work well when used prior to applying primer or undercoat. All components were finally sprayed in gloss black prior to assembly.
I’ve replaced all nuts & bolts with new ones as they look great against the new paintwork but are also less likely to strip. All nylock nuts should be replaced as a matter of course as they are usually only fitted in critical places and should never be reused.
The differential unit took a lot of cleaning, presumably with more than 40 years worth of, oil, grease and dirt accumulated on it, but it came up like new. New oil seals were fitted and the whole unit repainted in gloss black. Replacing the oil seals was not easy and if I ever do it again I shall entrust the work to a professional.

The refitting of the components on to the chassis was relatively straight forward but the many photographs I had taken previously were extremely useful. The only area I struggled with was fitting the rear spring. There is a special lifting tool for this job but it’s only of any use with a fully built car as you need the weight to counteract the strength of the spring, which obviously I did not have at this stage. Instead I attached the spring to the vertical links and used two large sash cramps between the diff’ and spring to compress it a little at a time, but also used a ratchet strap as an extra precaution just in case a clamp should break or slip. It was quite a relief to get the nuts in place and tightened!
I also had problems fitting the reconditioned front brake callipers as they kept fouling the outside face of the new discs. In the end I had to resort to leaving off the dust shields which then gave me sufficient clearance. I’m not sure why this was necessary but think it may be a result of a mix & match of earlier type callipers with later type vertical links. As the car will be for dry weather use only I’m not overly concerned at the lack of dust shields, but I will return to this at a later date to see if I can find a way to fit them.
Once I had a rolling chassis, and while access was easy, I partially fitted new brake lines, fuel lines and handbrake cables and I will return to complete these once the body tubs are reinstalled. The final stage for the chassis was to Waxoyl inside the box sections to try and ensure rust is kept at bay, hopefully for ever. This was a bit of a messy job but should prove worth the mess and effort. If you decide to Waxoyl your Triumph then make sure you have plenty of polythene sheeting available. The Waxoyl has to warmed until runny before being sprayed but it soon solidifies therefore dripping is kept to a minimum but beware, even a small drop is difficult to clean off your drive or garage floor.
 My next instalment will hopefully cover the restoration of the body tubs, but first I’ve got to work out how I work on and manoeuvre the large tubs while the chassis is taking up the garage floor space as I don’t want to store anything outside where it will be open to the elements.
Chassis restoration
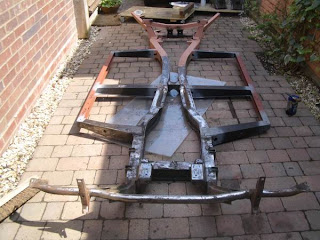
Rebuilding the chassis is the most adventurous task I’ve ever attempted on a car so there was more than a little trepidation as I cut into the first rotten outrigger. Before I began I got hold of detailed drawings of the chassis courtesy of Triumph guru Bill of Rarebits4Classics. These drawings are absolutely critical to anyone rebuilding a chassis as any misalignment will result in problems with steering or body alignment. In fact one of the first Heralds I ever owned did not sit level and it transpired that a rear outrigger had been fitted badly leading to a lilt to one side, that particular car needed a lump of concrete in one side of the boot to get it through the MOT – but those ‘fixes’ were par for the course in the ‘70s.
I digress. I then cut a piece of 2” angle iron to the same length as a side rail, and using the new rail as a template drilled 9mm holes in the angle iron to match the outer two body mounting fixings. This was then bolted tightly to the rotten outriggers and a G-clamp used to hold the central outrigger to the angle iron. Now by replacing one outrigger at a time I could ensure they all remained level and that the body mounting holes would be in exactly the right place.

This now left me with the problem of ensuring the outriggers attached to the main chassis rails in exactly the right place. The drawings were my first reference point but I also took my own measurements from fixed points on the chassis. Safe in the knowledge I now knew exactly where the outriggers needed to be located I set about removing the first rotten one with a hacksaw. Once removed I used an angle grinder to remove the remaining scrap metal ensuring I had a clean and perfectly level surface to work from.
Unfortunately when completing a couple of the outriggers I did find small bad areas on the main chassis rails but I was now able to cut out the bad metal and weld in plates to make good the chassis. Thankfully this rot wasn’t bad by any means, otherwise I would have needed to source another chassis. Once a plate was in place I could temporarily clamp on a new outrigger using a large G-clamp. Following some very careful measurements I began welding the new outrigger in place, starting with just a couple of tack welds until I was satisfied with the positioning. This was followed by welding everywhere the outrigger contacted the chassis, including the inner edges to be absolutely certain these weren’t going to fall off.
I then repeated the same process for the remaining four outriggers. My welding skills leave a lot to be desired but I am satisfied these outriggers are going nowhere soon! Once all outriggers were welded in place I was able to fit the side rails. After checking the measurements against the detailed drawings I was able to weld the new side rails in place.
The next task is to remove all the underseal and sticky oil from the main chassis rails. This is a horrible job as it’s extremely messy and there’s no quick way I know of. I used a blowtorch to soften the underseal (risky process, better to use a hot air gun) and ordinary paint scraper to start removing it, It soon became obvious that the underseal was hiding even more rust, presumably where water had penetrated the sealant. So the welder came out yet again resulting in more patches than a patchwork quilt.
My second tip to anyone contemplating a chassis restoration is carry out the clean up operation before starting any repair work as you may end up changing your mind regarding the suitability of the chassis for restoration.
Once I was satisfied that all welding was complete I set about removing the remnants of underseal and cruddy oil with thinners. One word of warning regarding using thinners as a cleaning agent, make sure your cleaning equipment is well away from the car if like me you do any more welding – I ended up setting everything on fire with the flames very rapidly spreading towards my wooden garage, but luckily I had my fire extinguisher to hand for such an emergency. This little bit of advice may sound so very obvious but this one error left me standing in the middle of a pool of flaming thinners!
Once I could see every last bit of metal and was satisfied all rot had been dealt with I began the final removing of all surface rust using rotary wire brushes and the angle grinder before coating the bare metal with an anti-rust coating.
So with the chassis now prepared for painting, and as I was less concerned about the quality of the finish than I was about rust returning (most of the chassis will be out of sight anyway), I decided to apply the primer/undercoat by brush to help ensure a good thick coat which will hopefully help keep rust at bay. The odd bits that couldn’t be reached by brush were sprayed with aerosol anti-rust primer, particularly around the diff’ area which is impossible to reach once everything is reassembled.
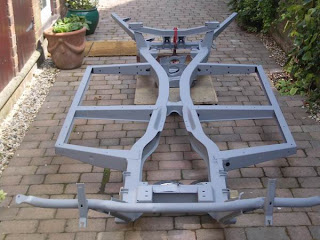
On now to the final stage of spraying the top coat. I’ve never sprayed before, other than with aerosol paint, so I approached this with some trepidation but as it turned out I needn’t have worried as it’s not as difficult as I imagined. I won’t be going in to any detail here as this is a subject in its own right and there are other people who know far more than I do on the subject, instead I will just concentrate on the logistics of the task.
I had already bought myself a compressor, spray gun, face mask, overalls, etc, the only thing I didn’t have was a spray booth. I couldn’t use the garage as it was packed to the rafters with the dismantled Herald so I decided to buy a 6mtr x 3mtr marquee off eBay. If anyone is thinking of re-spraying a car then I suggest you consider doing the same, it really is worth the additional cost to create a clean dust-free spray booth well away from the house, which can be erected in a few minutes, and is easily packed away ready for next time.
Choosing the colour wasn’t a difficult task as I wanted to take the opportunity to follow the original factory colour scheme. I was advised that the chassis would have originally been sprayed in the same colour as the primary colour of the bodywork, which in my case was Conifer Green. I managed to find a local paint supplier who, despite popular belief following recent legislative changes, is still able to supply me with cellulose paint mixed to any colour I need.
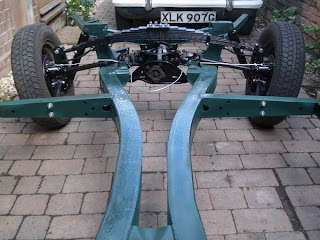
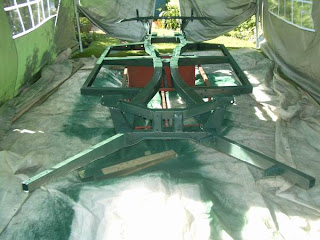
So with everything ready I got on with the spraying, which went pretty well and with no major issues, the end results of which can be seen in the photograph.
I had already bought myself a compressor, spray gun, face mask, overalls, etc, the only thing I didn’t have was a spray booth. I couldn’t use the garage as it was packed to the rafters with the dismantled Herald so I decided to buy a 6mtr x 3mtr marquee off eBay. If anyone is thinking of re-spraying a car then I suggest you consider doing the same, it really is worth the additional cost to create a clean dust-free spray booth well away from the house, which can be erected in a few minutes, and is easily packed away ready for next time.
Choosing the colour wasn’t a difficult task as I wanted to take the opportunity to follow the original factory colour scheme. I was advised that the chassis would have originally been sprayed in the same colour as the primary colour of the bodywork, which in my case was Conifer Green. I managed to find a local paint supplier who, despite popular belief following recent legislative changes, is still able to supply me with cellulose paint mixed to any colour I need.
So with everything ready I got on with the spraying, which went pretty well and with no major issues, the end results of which can be seen in the photograph.
In my next update I’ll be covering the chassis re-build, which is something I’m really looking forward to as this is where the shiny bits start to come together and I can take a break from sanding, grinding, and welding.
Let the restoration begin
Those of you who are members of the TSSC will recognise the following story of my Herald restoration as it is being serialised verbatim in The Courier.

I decided to leave the front suspension intact for as long as possible as it makes wheeling the chassis in & out so much easier, and I have made a trolley for the rear end with a section of chipboard and four castors. 
My next task is to rebuild the chassis and get it back to a rolling chassis and I’ll be reporting on how I tackled this in my next instalment. Wish me luck.
I’ve recently set about completing a full chassis-up restoration of a Triumph Herald and thought it might be a good idea to serialise progress via the Courier in the hope it makes interesting reading and hopefully might even be inspirational to anyone considering doing the same. I’m not aiming for concourse condition by any means but do want a car I know is going to be good for several years to come. I intend completing the rebuild on a tight budget but will be replacing the major components of the running gear, particularly the whole braking system.
It’s purely a finger in the air guestimate but I reckon the whole thing is going to take me about two years to complete. Due to the extended timeline I’m not going to provide updates to The Courier every month, instead I’ll be aiming for every three months in the hope I don’t bore you to death before the restoration is finished. I may have to skip a month or two depending on progress (or lack of it).
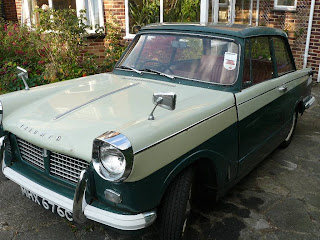
I owned a couple of Heralds in my youth in the late ‘70s, one of which was a two-tone green 1200, but gave up on Heralds soon after the arrival of my first child as I needed more suitable transport for carrying enough equipment to impress any F1 racing team. I then spent many years wishing I could have another Herald, just as a second car, but finance wouldn’t really allow it while the family were growing up. Eventually of course they all flew the nest and I found I now had a little spare cash and spare time on my hands, so I scoured the local ads and the internet and found a decent one, a 13/60 convertible, at only my second viewing and within two miles of home.
I ran this car for five years slowly completing a rolling restoration, mostly cosmetics and minor mechanics, and I was very happy with it – but I still hankered for another two-tone green 1200 saloon. Then last year I spotted one for sale by a TSSC member. It was the right colour, the right year (1965) at the right price, and with a full MOT, the only trouble was it was in Southampton which is about 175 miles away from where I live. After a few days procrastination I decided to take the plunge and go and take a look at it.
Initially it appeared to be just what I was looking for but closer inspection uncovered a few areas that would need attention. Nevertheless I went ahead and bought it and drove it the 175 miles back to Shropshire. It ran really well on the way home cruising at upwards of 70mph most of the way. The only troubles I had on the journey were a sticky accelerator and clutch slip if I tried to accelerate too quickly.
My intention was initially to complete a rolling restoration, much like I did with the 13/60, and use the car at weekends and special occasions. As I can only drive one Herald at a time I reluctantly decided to sell the 13/60 and luckily it went to someone who was a keen classic enthusiast.
My first task was to remove the engine to replace the clutch, but this proved to be a major turning point in my plans as I decided to continue stripping it and complete a full chassis-up restoration – something I’ve never done before. Before I knew it there were so many bits in boxes it dawned on me that there was no turning back, and I now owned a taxed & tested car in bits. At the same time I received an offer I couldn’t refuse from fellow TSSC member Jonathan Ryder, a ’68 Herald 1200 saloon in Gunmetal blue for spares or repair, and thinking I was likely to need a good source of parts I gladly accepted his offer.
I arranged to have this second car delivered to my house without having even seen it in the flesh, up to this point all I had seen was a couple of photographs from when it went in to storage four years earlier. When it arrived I knew almost immediately it was too good to break for spares so I set about getting it roadworthy again. It took me several weeks, some parts off the ’65 and bit of cash, but in January this year it was finally taxed & tested and is now my run around while the ’65 undergoes restoration.
There isn’t very much to document about stripping the car to its chassis as it’s all just a nut & bolt job, however I did make sure I took plenty of photographs as reference material for when I come to put it back together again.
One of the biggest problems I had is the fact I only have a single garage which is only ten feet wide, so not very much room for storing the mountain of parts that I was removing. To get around this I built a makeshift platform just high enough to allow the chassis, still on its wheels, to roll underneath. My garage is now unusable as a workshop but then it does mean everything is under cover, but the downside is all work has to be completed outside so progress is now governed by the weather as well as available finance and spare time.
It’s purely a finger in the air guestimate but I reckon the whole thing is going to take me about two years to complete. Due to the extended timeline I’m not going to provide updates to The Courier every month, instead I’ll be aiming for every three months in the hope I don’t bore you to death before the restoration is finished. I may have to skip a month or two depending on progress (or lack of it).
I owned a couple of Heralds in my youth in the late ‘70s, one of which was a two-tone green 1200, but gave up on Heralds soon after the arrival of my first child as I needed more suitable transport for carrying enough equipment to impress any F1 racing team. I then spent many years wishing I could have another Herald, just as a second car, but finance wouldn’t really allow it while the family were growing up. Eventually of course they all flew the nest and I found I now had a little spare cash and spare time on my hands, so I scoured the local ads and the internet and found a decent one, a 13/60 convertible, at only my second viewing and within two miles of home.
I ran this car for five years slowly completing a rolling restoration, mostly cosmetics and minor mechanics, and I was very happy with it – but I still hankered for another two-tone green 1200 saloon. Then last year I spotted one for sale by a TSSC member. It was the right colour, the right year (1965) at the right price, and with a full MOT, the only trouble was it was in Southampton which is about 175 miles away from where I live. After a few days procrastination I decided to take the plunge and go and take a look at it.
Initially it appeared to be just what I was looking for but closer inspection uncovered a few areas that would need attention. Nevertheless I went ahead and bought it and drove it the 175 miles back to Shropshire. It ran really well on the way home cruising at upwards of 70mph most of the way. The only troubles I had on the journey were a sticky accelerator and clutch slip if I tried to accelerate too quickly.
My intention was initially to complete a rolling restoration, much like I did with the 13/60, and use the car at weekends and special occasions. As I can only drive one Herald at a time I reluctantly decided to sell the 13/60 and luckily it went to someone who was a keen classic enthusiast.
My first task was to remove the engine to replace the clutch, but this proved to be a major turning point in my plans as I decided to continue stripping it and complete a full chassis-up restoration – something I’ve never done before. Before I knew it there were so many bits in boxes it dawned on me that there was no turning back, and I now owned a taxed & tested car in bits. At the same time I received an offer I couldn’t refuse from fellow TSSC member Jonathan Ryder, a ’68 Herald 1200 saloon in Gunmetal blue for spares or repair, and thinking I was likely to need a good source of parts I gladly accepted his offer.
I arranged to have this second car delivered to my house without having even seen it in the flesh, up to this point all I had seen was a couple of photographs from when it went in to storage four years earlier. When it arrived I knew almost immediately it was too good to break for spares so I set about getting it roadworthy again. It took me several weeks, some parts off the ’65 and bit of cash, but in January this year it was finally taxed & tested and is now my run around while the ’65 undergoes restoration.
There isn’t very much to document about stripping the car to its chassis as it’s all just a nut & bolt job, however I did make sure I took plenty of photographs as reference material for when I come to put it back together again.
One of the biggest problems I had is the fact I only have a single garage which is only ten feet wide, so not very much room for storing the mountain of parts that I was removing. To get around this I built a makeshift platform just high enough to allow the chassis, still on its wheels, to roll underneath. My garage is now unusable as a workshop but then it does mean everything is under cover, but the downside is all work has to be completed outside so progress is now governed by the weather as well as available finance and spare time.
Once the platform was ready I set about removing the tubs. Apart from the usual problems of corroded fixings, particularly the body mounting bolts, it was all fairly straightforward and came apart reasonably quickly. The body tubs were lifted without any major issue and manoeuvred on to the platform with the help of an engine hoist and rope. The roof was a little more tricky as it’s one of those jobs where you need two pairs of hands or a willing helper, neither of which were available at the time I needed them. I did have problems removing the petrol tank as the outlet fell apart when I tried to undo the drain plug, luckily I had already drained the contents.
I decided to leave the front suspension intact for as long as possible as it makes wheeling the chassis in & out so much easier, and I have made a trolley for the rear end with a section of chipboard and four castors.
As the tubs came off it dawned on me that the rust was much extensive than I had initially realised (isn’t that always the case?) as three outriggers were totally shot and needed to be replaced, and two others needed some patching as a minimum. At this point I began to wonder if the restore was really feasible but after prolonged consideration (well five minutes actually) I decided to press on. My first major step towards restoring the chassis is to replace all dodgy outriggers so I went out and bought five new outriggers and both side rails. The offside front outrigger had been replaced by the previous owner so that one will stay, and the boot extensions are not too bad so I’m hoping to salvage those but I’ll reserve final judgment until I’ve inspected them a little closer.
My next task is to rebuild the chassis and get it back to a rolling chassis and I’ll be reporting on how I tackled this in my next instalment. Wish me luck.
My Triumphs
I've owned five Triumph Heralds in my time, two when I was a teenager, and three in more recent years. The first two were old bangers bought for next to nothing but were my daily drivers for some time. I always liked my Heralds and decided when I could I would buy one to restore.
My chance came once the kids had all left home and I had few spare quid in my pocket, I thought what's the point in having money spare when I can throw it all away on an old car - so I went out and bought a Herald 13/60.
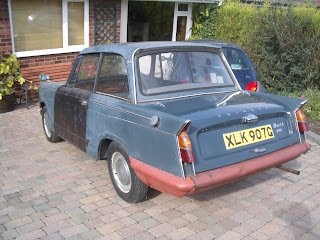
Around the same time the opportunity came up for a free '68 1200 Herald for spares. The offer was too good to refuse so all I needed to day was get it transported from Hereford to my driveway, which I was able to arrange for £125. When the car arrived it was in a poor state after standing for four years but after pouring in some fresh petrol and re-fitting the battery, which had been stored in the foot well, I managed to get the engine runing.
My chance came once the kids had all left home and I had few spare quid in my pocket, I thought what's the point in having money spare when I can throw it all away on an old car - so I went out and bought a Herald 13/60.

This car was my pride & joy for five years but all along I was hankering for a two-tone green hardtop 1200, just like the first one I had when I was 17. I personally think is the best colour scheme for a Herald. I spent months looking for the right car and eventually found a '65 model but had to travel 175 miles to get it. The drive back was a bit nerve wracking but worth it, it drove almost perfectly apart from a notchy accelerator cable and a slipping clutch.
Around the same time the opportunity came up for a free '68 1200 Herald for spares. The offer was too good to refuse so all I needed to day was get it transported from Hereford to my driveway, which I was able to arrange for £125. When the car arrived it was in a poor state after standing for four years but after pouring in some fresh petrol and re-fitting the battery, which had been stored in the foot well, I managed to get the engine runing.
I soon began to realise that, although very tatty looking, this car was too good to scrap so I set about spending a little time and money and got it through the MOT about three months after buying it.

This is how it looked soon after arriving after a quick wash and putting some air in the flat tyres.
So despite my two-tone '65 Herald having almost a full MOT I decided to take it off the road and complete a full chassis up restoration.
Subscribe to:
Posts (Atom)
