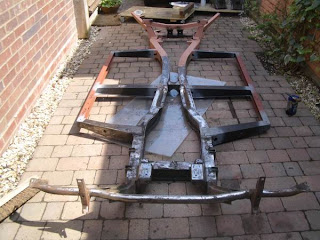
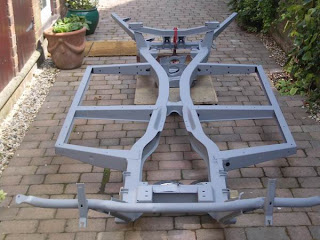
You will probably recall that my previous two reports covered how I tacked the strip down of the car and progressed to the restoration and spraying of the chassis. This instalment will detail how I set about rebuilding the rolling chassis, the part of the restoration I was most looking forward to as this is where the first shiny new bits get fitted.
When the car was stripped I left as many components as possible as sub-assemblies. There were two good reasons for this, firstly the reduced likelihood of loosing small parts, and secondly I didn’t need to commit to memory all the detail of how the sub-assemblies actually bolted together, I could now strip them and rebuild them almost immediately with the detail still fresh in my mind. I also have a nearly 200 photographs taken during the strip down to use a reference points for the rebuild. I’m also lucky enough to own a second Herald which I will use as reference if I get really stuck.
One of my objectives when deciding to undertake this restoration was to renew the entire braking system, this was one area I was not prepared to compromise on as previous Herald experience has taught me the need to have the brakes working as efficiently as possible if I’m not to run into the back of a modern car with ultra efficient servo-assisted brakes. I’m not going to upgrade any components but will instead restore the system to its original specification as I believe the braking system is up to modern standards if well maintained. With this in mind I am going to be fitting professionally reconditioned callipers, new discs, new shoes and pads, new master cylinder, new rear slave cylinders, and new copper pipes. The brake drums look like recent replacements so these are the only items not to be replaced.
All steering joints will also be replaced even though they look to be decent condition as I see little point in re-fitting key components which have a limited road-going life anyway, therefore I will be replacing the ball joints, trunnion bushes, trackrod ends, and anti-roll bar drop links. The steering rack looks to be in very good condition and as these are not known to wear unduly I will refit the existing unit, but I will replace the gaiters as failure here can lead to premature failure of the rack itself.
All steering and suspension rubber bushes will be replaced with new ones, but not with the modern polybushes that everyone seems to rate as I think the Herald gives a decent ride in standard form for normal road use so I’m sticking with the original set-up.
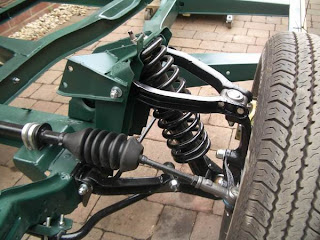
I am also going to renew the dampers all round with new coil springs on the front. The rear leaf spring appears to have been replaced or reconditioned previously so I’ll just refurbish and reuse it. Any damaged structural components will be replaced, with second hand parts sought where appropriate to reduce overall cost, eg one badly worn lower wishbone.
I began by stripping the steering and suspension assemblies down to their component parts. This is where a bit of ingenuity may be called for as the wishbone bolts are often seized in the bushes and cannot always be removed easily, as was the case for me in all but one bolt.
There are two ways to remove the bolts, you can apply repeated doses of penetrating oil over a few days in the hope that will release them, or if you’re replacing the bushes and bolts anyway then you can simply cut through the bolts with a hacksaw. Once the wishbones are released you can then push out the bushes with the aid of a vice and a couple of sockets, or if they’re really seized solid you may need to revert to a blow torch to melt the rubber thereby allowing the bushes to fall out. I wouldn’t recommend this latter method if it can be avoided as the smell of burning rubber at close quarters is not very pleasant, plus there is the obvious health risk as well as fire hazard.
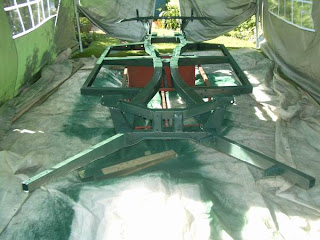
All parts to be re-used were cleaned of crud using various tools including wire brush, rotary wire brushes, sanding disks, angle grinder, scraper, knife, etc. Once all traces of old rust and underseal were removed everything was coated in Kurust. I’ve used Kurust many times and it always seems to work well when used prior to applying primer or undercoat. All components were finally sprayed in gloss black prior to assembly.
I’ve replaced all nuts & bolts with new ones as they look great against the new paintwork but are also less likely to strip. All nylock nuts should be replaced as a matter of course as they are usually only fitted in critical places and should never be reused.
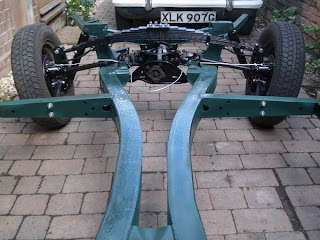
The differential unit took a lot of cleaning, presumably with more than 40 years worth of, oil, grease and dirt accumulated on it, but it came up like new. New oil seals were fitted and the whole unit repainted in gloss black. Replacing the oil seals was not easy and if I ever do it again I shall entrust the work to a professional.
When the car was stripped I left as many components as possible as sub-assemblies. There were two good reasons for this, firstly the reduced likelihood of loosing small parts, and secondly I didn’t need to commit to memory all the detail of how the sub-assemblies actually bolted together, I could now strip them and rebuild them almost immediately with the detail still fresh in my mind. I also have a nearly 200 photographs taken during the strip down to use a reference points for the rebuild. I’m also lucky enough to own a second Herald which I will use as reference if I get really stuck.
One of my objectives when deciding to undertake this restoration was to renew the entire braking system, this was one area I was not prepared to compromise on as previous Herald experience has taught me the need to have the brakes working as efficiently as possible if I’m not to run into the back of a modern car with ultra efficient servo-assisted brakes. I’m not going to upgrade any components but will instead restore the system to its original specification as I believe the braking system is up to modern standards if well maintained. With this in mind I am going to be fitting professionally reconditioned callipers, new discs, new shoes and pads, new master cylinder, new rear slave cylinders, and new copper pipes. The brake drums look like recent replacements so these are the only items not to be replaced.
All steering joints will also be replaced even though they look to be decent condition as I see little point in re-fitting key components which have a limited road-going life anyway, therefore I will be replacing the ball joints, trunnion bushes, trackrod ends, and anti-roll bar drop links. The steering rack looks to be in very good condition and as these are not known to wear unduly I will refit the existing unit, but I will replace the gaiters as failure here can lead to premature failure of the rack itself.
All steering and suspension rubber bushes will be replaced with new ones, but not with the modern polybushes that everyone seems to rate as I think the Herald gives a decent ride in standard form for normal road use so I’m sticking with the original set-up.
I am also going to renew the dampers all round with new coil springs on the front. The rear leaf spring appears to have been replaced or reconditioned previously so I’ll just refurbish and reuse it. Any damaged structural components will be replaced, with second hand parts sought where appropriate to reduce overall cost, eg one badly worn lower wishbone.
I began by stripping the steering and suspension assemblies down to their component parts. This is where a bit of ingenuity may be called for as the wishbone bolts are often seized in the bushes and cannot always be removed easily, as was the case for me in all but one bolt.
There are two ways to remove the bolts, you can apply repeated doses of penetrating oil over a few days in the hope that will release them, or if you’re replacing the bushes and bolts anyway then you can simply cut through the bolts with a hacksaw. Once the wishbones are released you can then push out the bushes with the aid of a vice and a couple of sockets, or if they’re really seized solid you may need to revert to a blow torch to melt the rubber thereby allowing the bushes to fall out. I wouldn’t recommend this latter method if it can be avoided as the smell of burning rubber at close quarters is not very pleasant, plus there is the obvious health risk as well as fire hazard.
All parts to be re-used were cleaned of crud using various tools including wire brush, rotary wire brushes, sanding disks, angle grinder, scraper, knife, etc. Once all traces of old rust and underseal were removed everything was coated in Kurust. I’ve used Kurust many times and it always seems to work well when used prior to applying primer or undercoat. All components were finally sprayed in gloss black prior to assembly.
I’ve replaced all nuts & bolts with new ones as they look great against the new paintwork but are also less likely to strip. All nylock nuts should be replaced as a matter of course as they are usually only fitted in critical places and should never be reused.
The differential unit took a lot of cleaning, presumably with more than 40 years worth of, oil, grease and dirt accumulated on it, but it came up like new. New oil seals were fitted and the whole unit repainted in gloss black. Replacing the oil seals was not easy and if I ever do it again I shall entrust the work to a professional.

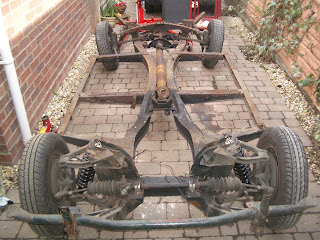
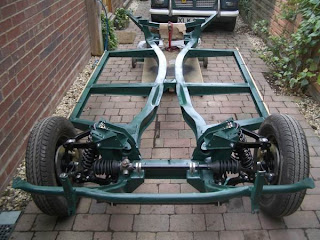
The refitting of the components on to the chassis was relatively straight forward but the many photographs I had taken previously were extremely useful. The only area I struggled with was fitting the rear spring. There is a special lifting tool for this job but it’s only of any use with a fully built car as you need the weight to counteract the strength of the spring, which obviously I did not have at this stage. Instead I attached the spring to the vertical links and used two large sash cramps between the diff’ and spring to compress it a little at a time, but also used a ratchet strap as an extra precaution just in case a clamp should break or slip. It was quite a relief to get the nuts in place and tightened!
I also had problems fitting the reconditioned front brake callipers as they kept fouling the outside face of the new discs. In the end I had to resort to leaving off the dust shields which then gave me sufficient clearance. I’m not sure why this was necessary but think it may be a result of a mix & match of earlier type callipers with later type vertical links. As the car will be for dry weather use only I’m not overly concerned at the lack of dust shields, but I will return to this at a later date to see if I can find a way to fit them.
Once I had a rolling chassis, and while access was easy, I partially fitted new brake lines, fuel lines and handbrake cables and I will return to complete these once the body tubs are reinstalled. The final stage for the chassis was to Waxoyl inside the box sections to try and ensure rust is kept at bay, hopefully for ever. This was a bit of a messy job but should prove worth the mess and effort. If you decide to Waxoyl your Triumph then make sure you have plenty of polythene sheeting available. The Waxoyl has to warmed until runny before being sprayed but it soon solidifies therefore dripping is kept to a minimum but beware, even a small drop is difficult to clean off your drive or garage floor.
 My next instalment will hopefully cover the restoration of the body tubs, but first I’ve got to work out how I work on and manoeuvre the large tubs while the chassis is taking up the garage floor space as I don’t want to store anything outside where it will be open to the elements.