You may recall from my first instalment the tubs are stored on a platform above the chassis, I now needed to devise a way of easily moving the tubs to enable me to work on them. Most people begin with the front tub but I decided to start with the rear tub as this occupies most of the available garage space, my plan being once finished to drop it on the chassis so I could easily wheel it in and out of the garage in one lump. After a lot of trial and error with the engine hoist I settled on mounting one block of wood on brackets attached to the seat belt fixings, and a second block mounted behind where the rear seat would be. Attaching this second block required drilling the steel work but it will be out of sight behind the seat once reassembled. I also attached a third block of wood to sit proud of the parcel shelf to allow me to turn the tub upside down without causing damage. A fourth block of wood bridged the first two and gave me somewhere to attach the engine hoist. Finally I bolted a block of wood to the boot slam panel to protect it when being lifted as it pressed on the engine hoist.

With all this place I was finally able to withdraw the tub from the garage and lower it to the ground. I now rolled the tub right over on its back end until it sat upside down, resting on the blocks of wood I had previously fitted. I now had to devise a way to lift and move the tub upside down as I didn’t fancy rolling it back over every time I wanted to work on it. I drilled bolted a length of angle iron to a pair of body mounting brackets, and attached a block of wood via the tub mountings holes situated in the drive shaft tunnel. I could now attach a lifting strap and shackle between the angle iron and block of wood, via which I could lift the tub with the engine hoist.
This all sounds quick and easy but believe me when I say it took several hours of head scratching, and I felt I was taking three steps forward and two steps back. This is not an ideal solution and probably would not pass a health & safety inspection, but at least I could now move the tub either way up, single handed, and in a matter of minutes.
Right, now I could get to work removing what felt like a mountain of underseal. After a little experimentation I decided the easiest way to remove the underseal was to lightly soften it with an electric paint stripping gun and old wood chisels of various sizes. I soon discovered it didn’t pay to apply too much heat as this resulted in a very sticky mess to clean up later! As this is such a laborious task, I tackled the job an hour at a time over a couple of weeks, whenever I had a spare hour I would be out there stripping underseal.
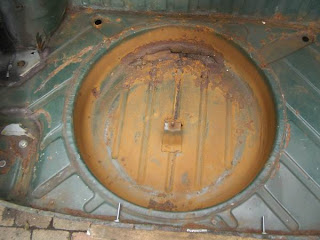
It was only once all the underseal was removed that the extent of rot became apparent. I was going to need two outer wheel arches and a spare wheel well as well as several patches welding in place before this tub would be ready. Don’t get me wrong, the tub is still not bad considering it’s unlikely to have ever been removed in the 43 years since it left the showroom.
I’m not going to go into detail but I had to cut out and replace the rotten metal beginning with the boot corners where the tub attaches to the boot outriggers. These are double-skinned so a little tricky to replace but absolutely necessary for structural integrity. I also had to repair a couple of nasty holes just behind the wheel arches, the front edge of floor where it joins the front tub, and I had to fit a repair panel to the nearside rear wing where it joins the floor just in front of the wheel arch. I could not locate a spare wheel well in good condition but I did find a brand new wheel well from a Vauxhall Astra for only £20 (sorry to all the purists). If anyone would like to do the same then according to the label that was attached to the well the Vauxhall part number is 9196180
This all sounds quick and easy but believe me when I say it took several hours of head scratching, and I felt I was taking three steps forward and two steps back. This is not an ideal solution and probably would not pass a health & safety inspection, but at least I could now move the tub either way up, single handed, and in a matter of minutes.
Right, now I could get to work removing what felt like a mountain of underseal. After a little experimentation I decided the easiest way to remove the underseal was to lightly soften it with an electric paint stripping gun and old wood chisels of various sizes. I soon discovered it didn’t pay to apply too much heat as this resulted in a very sticky mess to clean up later! As this is such a laborious task, I tackled the job an hour at a time over a couple of weeks, whenever I had a spare hour I would be out there stripping underseal.
It was only once all the underseal was removed that the extent of rot became apparent. I was going to need two outer wheel arches and a spare wheel well as well as several patches welding in place before this tub would be ready. Don’t get me wrong, the tub is still not bad considering it’s unlikely to have ever been removed in the 43 years since it left the showroom.
I’m not going to go into detail but I had to cut out and replace the rotten metal beginning with the boot corners where the tub attaches to the boot outriggers. These are double-skinned so a little tricky to replace but absolutely necessary for structural integrity. I also had to repair a couple of nasty holes just behind the wheel arches, the front edge of floor where it joins the front tub, and I had to fit a repair panel to the nearside rear wing where it joins the floor just in front of the wheel arch. I could not locate a spare wheel well in good condition but I did find a brand new wheel well from a Vauxhall Astra for only £20 (sorry to all the purists). If anyone would like to do the same then according to the label that was attached to the well the Vauxhall part number is 9196180
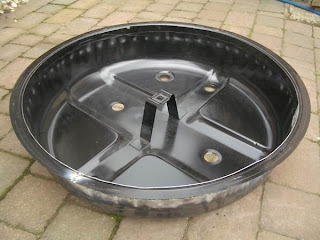
The new well was just a few millimetres larger in diameter than the original but unfortunately 50mm deeper. I had to reduce the depth otherwise it would sit below the rear valance and look totally wrong. Using an electric jigsaw I removed the top 50mm from the well, and the resulting band slipped down the lower half, effectively lowering the top lip by 50mm. All I had to do now was re-weld the two halves – all sounds nice and easy doesn’t it! I hope I’ve got this right but I’m not going to know for sure until everything is finally put back together in a few months time, therefore I haven’t welded the well in place just yet.
Replacing the outer wheel arches was no easy task either as they were a different profile to the originals so were difficult to mate up with the inner arches. I expect if I had replaced both halves then this would not have been a problem, so another tip for anyone contemplating their wheel arches is to do them in complete sets.
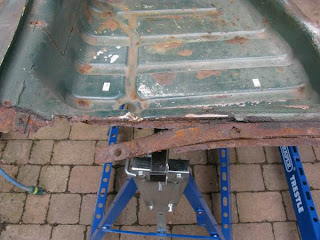
The final fabrication was to repair the front edge of the floor pans as they had rotted away where they overlap with the front tub. This is not a difficult task but care has to be taken to ensure the holes are correctly positioned otherwise I might have problems when the two tubs are re-united.
Refurbishing the front tub was more-or-less a repeat process so I won’t go in to detail, but as you can probably imagine it was another round of chopping out rot and letting in new steel.
Finally all loose paint was removed from the underside before painting it with Kurust and rust-preventative undercoat. The only thing left to do now is to sort out the doors, bonnet, sills, boot lid and valances (if I say it quick enough it doesn’t sound too bad!).
Before I move on to these other panels I will be re-spraying the tubs so I can attach them to the chassis thereby making more room in the garage. I will probably be covering this in my next instalment, but don’t expect too much as I’m a total novice with the spray gun.
Before I move on to these other panels I will be re-spraying the tubs so I can attach them to the chassis thereby making more room in the garage. I will probably be covering this in my next instalment, but don’t expect too much as I’m a total novice with the spray gun.
